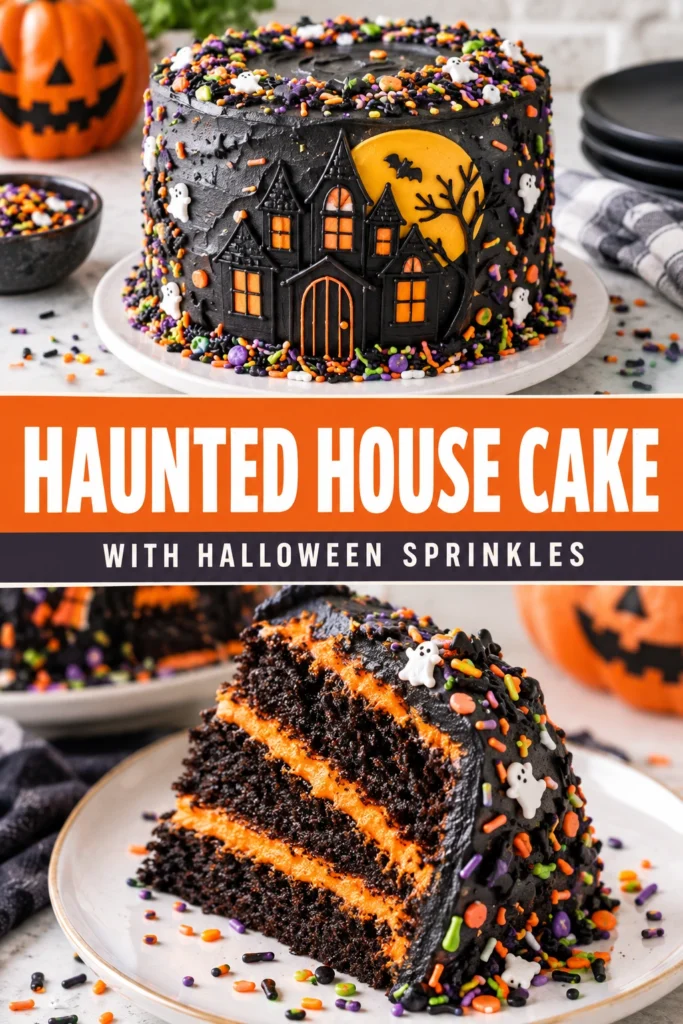
A centerpiece dessert can make or break a Halloween party mood. This cake brings a whimsical, spooky vibe to the table without requiring professional pastry skills.
The Haunted House Cake is a layered chocolate creation designed to look like a crooked mansion. It uses a combination of stacked cakes and creative frosting to achieve a weathered look.
Home cooks appreciate this recipe because it prioritizes a fun visual impact over technical perfection. The charm lies in the slightly uneven walls and dripping frosting.
Unlike store-bought cakes that often taste overly sweet and artificial, this version uses real cocoa and butter for a rich, balanced flavor.
This recipe is ideal for parents wanting a project to do with children or hosts who need a high-impact dessert that is manageable to assemble.
Preparation is simplified to bake the cake layers a day in advance, leaving only the decorating for the event day.
Follow the guide below to build your own edible spooky manor.
- ●Why You’ll Love This Recipe
- ●A Brief Background on the Design
- ●Perfect For Family Halloween Gatherings
- ●Chocolate Cake Spotlight
- ●Halloween Sprinkles Spotlight
- ●Key Ingredients
- ●How to Make It
- ●Pro Tips
- ●Delicious Variations
- ●Best Ways to Serve
- ●Storage and Leftovers
- ●Frequently Asked Questions
- ●Why This Recipe Belongs in Your Weekly Rotation
- ●Final Thoughts
Building a themed cake can feel intimidating, but this design is intentionally rustic and forgiving.
- ●The crooked architecture means mistakes actually add to the haunted aesthetic.
- ●Deep chocolate flavors appeal to both children and adults.
- ●Halloween sprinkles provide an instant burst of color without needing complex piping.
- ●Standard baking pans are used, so no specialty equipment is required.
- ●Layers can be prepped ahead of time to reduce stress.
- ●The height of the cake creates a dramatic focal point on any dessert table.
- ●Customization is easy; you can add ghosts or spiders based on what you have.
- ●It pairs beautifully with other treats like Candy Apples With Halloween Sprinkles Easy Halloween Treat Ideas For Kids
- ●The frosting acts as a glue, making the structure surprisingly stable.
This cake balances the thrill of a themed project with the reliability of a classic chocolate cake.
A Brief Background on the Design |
The concept of the haunted house cake relies on vertical stacking. cake layers into different sizes, you create a tapering effect that mimics a multi-story building.
Visual interest is added through “weathered” frosting techniques. Instead of smooth sides, a rough application of buttercream suggests peeling paint and old stone.
The addition of festive sprinkles serves as the “debris” or “magic dust” surrounding the house, filling in gaps and adding a playful contrast to the dark chocolate.
This approach transforms a standard cake into a piece of edible art that encourages guests to interact with the dessert.
Perfect For Family Halloween Gatherings |
This recipe is a great fit for family gatherings because the assembly process is interactive. Children can help place the sprinkles or decide where the “windows” should go on the house.
For those hosting larger parties, the cake provides enough servings to satisfy a crowd while remaining easier to manage than individual cupcakes. If you prefer smaller treats, you might also enjoy Haunted Forest Cupcakes Spooky Sweet And Twisted Treats Halloween Dessert Ideas
During the busy October season, the ability to bake layers on Friday and decorate on Saturday makes this a realistic choice for a hectic schedule.
Chocolate Cake Spotlight |
The base of this dessert is a moist, cocoa-heavy cake. Chocolate is the ideal choice here because the dark color provides a natural starting point for a spooky theme, reducing the need for excessive artificial food coloring.
A high-quality cocoa powder ensures the cake has a depth of flavor that cuts through the sweetness of the buttercream. The crumb is kept tight and sturdy, which is essential for supporting the weight of the stacked layers without collapsing.
Halloween Sprinkles Spotlight |
Sprinkles are more than just a garnish in this recipe; they provide the primary color palette. Orange, purple, and green sprinkles break up the dark chocolate tones and add a necessary crunch to the soft cake.
Using a mix of shapes, such as stars, bats, or simple nonpareils, creates a layered visual effect. They can be pressed into the frosting or scattered around the base of the cake to simulate a spooky graveyard lawn.
Key Ingredients |
Each component plays a specific role in creating the structure and flavor of the house.
- ●All-purpose flour — Provides the structural foundation for the cake layers.
- ●Unsweetened cocoa powder — Delivers the intense chocolate flavor and dark color.
- ●Granulated sugar — Sweetens the batter and helps create a tender crumb.
- ●Baking soda — Acts as the leavening agent to ensure the layers rise.
- ●Unsalted butter — Adds richness to the cake and creates a creamy base for the frosting.
- ●Eggs — Binds the ingredients together and adds stability to the height.
- ●Buttermilk — Keeps the chocolate cake moist and adds a slight tang.
- ●Vanilla extract — Enhances the chocolate notes with a warm aromatic finish.
- ●Powdered sugar — Used to create a stiff buttercream that holds the house layers in place.
- ●Halloween sprinkles — Adds festive color and a textural contrast.
How to Make It |
Assemble the cake carefully to ensure the house stays upright while looking appropriately eerie.
- Bake the layers: Prepare three round chocolate cakes of varying sizes (e.g., 8-inch, 6-inch, and 4-inch). Bake until a toothpick comes out clean; overbaking can lead to dry cake that crumbles during stacking.
- Cool completely: Allow cakes to cool in the pan for 10 minutes before transferring to a wire rack. Cold cakes are much easier to trim and stack than warm ones, which may slide.
- Prepare the frosting: Beat butter and powdered sugar until fluffy, then fold in cocoa powder and vanilla. Ensure the frosting is thick enough to support the weight of the cakes; if it is too runny, refrigerate it for 15 minutes.
- Stack the house: Place the largest cake on the platter and spread a thick layer of frosting on top. Center the medium cake on top of that, followed cake. Do not worry if they are slightly off-center; this adds to the “haunted” look.
- Apply the “weathered” coat: Frost the outside of the house using a spatula. Instead of smoothing the sides, leave peaks and ridges in the frosting to look like old stone or peeling plaster.
- Add the details: Use a small amount of frosting to create windows and a door. If you want a more gothic feel, you could refer to the Spooktacular Black Velvet Halloween Cake Recipe To Impress Gothic Dessert Ideas for inspiration.
- Decorate with sprinkles: Press Halloween sprinkles into the frosting on the roof and around the base of the cake. Add them while the frosting is still tacky so they adhere properly.
1A few small adjustments can make the assembly process much smoother.
- ●2Freeze the layers: Put the baked cakes in the freezer for 30 minutes before trimming to prevent excess crumbling.
- ●3Use a cake board: Place the bottom layer on a sturdy cardboard cake circle to make transporting the house easier.
- ●4Crumb coat first: Apply a very thin layer of frosting to seal in crumbs, chill for 20 minutes, then apply the final decorative layer.
- ●5Stabilize with dowels: For very tall cakes, insert a wooden skewer or plastic straw through the center of all three layers to prevent sliding.
- ●6Avoid over-mixing: Stop mixing the batter as soon as the flour disappears to keep the cake tender and avoid a rubbery texture.
Delicious Variations |
You can easily adapt this recipe to suit different tastes or dietary needs.
- ●Red Velvet Base: Swap the chocolate cake for red velvet for a surprising color contrast when sliced, similar to the Indulge In Black Velvet Halloween Cake Spooky Delicious Easy Halloween Dessert
- ●Pumpkin Spice Twist: Use a pumpkin spice cake for the base and orange-tinted frosting for a more autumnal feel.
- ●Filling Layers: Add a layer of raspberry jam or chocolate ganache between the cake tiers for extra moisture and flavor.
- ●Gluten-Free Option: Replace the all-purpose flour with a high-quality 1:1 gluten-free baking blend.
- ●Adult version: Add a touch of espresso powder to the batter to deepen the chocolate flavor, as seen in the Chocolate Halloween Cake Elegant Spooky Fun For Adults Adult Halloween Dessert
These changes allow you to tailor the cake to the specific vibe of your party.
Best Ways to Serve |
Presentation is key when serving a themed dessert like this.
- ●Themed Platter: Place the cake on a dark slate or wooden board to enhance the spooky atmosphere.
- ●Atmospheric Lighting: Serve the cake under dim lighting or near orange fairy lights to make the colors pop.
- ●Accompaniments: Serve slices with a side of vanilla bean ice cream or a drizzle of warm chocolate sauce.
To slice the cake, use a sharp serrated knife and cut vertically through all layers at once. This ensures that each guest gets a piece of the house from top to bottom.
For a complete dessert spread, place the cake in the center and surround it with smaller treats like cookies or fruit to create a cohesive landscape.
Storage and Leftovers |
Refrigerating
Store the cake in an airtight container or under a cake dome in the refrigerator for up to 5 days. The buttercream will firm up, which helps maintain the house structure.
Reheating
Do not reheat the entire cake. Instead, let individual slices sit at room temperature for 30 to 60 minutes before eating to allow the frosting to soften naturally.
Freezing
Unfrosted cake layers can be wrapped tightly in plastic wrap and foil and frozen for up to 3 months. Thaw completely in the refrigerator before frosting and assembling.
Frequently Asked Questions |
- ●Q: How do I stop the cake layers from sliding?A: Use a stiff buttercream frosting and ensure the cake layers are completely cool before stacking. If the cake feels unstable, you can insert a wooden dowel or a long skewer through the center of all layers to lock them in place.
- ●Q: Can I use a boxed cake mix for this recipe?A: Yes, a boxed chocolate mix works well. To make it sturdier for stacking, replace the water in the instructions with milk and add an extra egg to provide more structure to the crumb.
- ●Q: What if I don’t have three different sized pans?A: You can bake three cakes of the same size and trim them using a serrated knife. Cut the middle cake into a smaller circle and the top cake into an even smaller one to create the tiered effect.
- ●Q: Do the sprinkles bleed into the frosting?A: High-quality sprinkles generally stay vibrant. However, if you are using a very moist frosting, add the sprinkles immediately before serving to prevent the colors from leaching into the white or chocolate buttercream.
- ●Q: How can I make the house look more “decayed”?A: Use a fork to create scratch marks in the frosting or leave some areas of the cake exposed. You can also dust the finished cake with a tiny bit of powdered sugar to simulate cobwebs or dust.
Why This Recipe Belongs in Your Weekly Rotation |
While a haunted house cake is a seasonal specialty, the core chocolate cake recipe is a reliable staple for any occasion. Once you master the moist crumb and stable frosting, you can use these components for birthdays or casual weekend treats.
Having a go-to dessert that combines visual flair with simple execution reduces the stress of hosting. It proves that you do not need professional training to create a centerpiece that impresses your guests.
The flexibility of the design means you can adapt it to any theme throughout the year, making it a valuable addition to your baking repertoire.
Final Thoughts |
This Haunted House Cake combines a rich, chocolatey base with a playful, spooky design. It is a manageable project that relies on creativity rather than precision, making it accessible for any home cook.
Whether you are hosting a large bash or a small family gathering, this cake provides a focal point that is as delicious as it is visually striking.
Grab your sprinkles and start building your own edible manor today.
Haunted House Cake with Halloween Sprinkles
- Total Time: 1 hour 20 minutes
- Yield: 12 servings 1x
Description
A towering, three-tiered chocolate cake designed to look like a haunted mansion. Decorated with weathered buttercream and festive Halloween sprinkles for a spooky effect.
Ingredients
- 2 cups all-purpose flour
- 2 cups granulated sugar
- 3/4 cup unsweetened cocoa powder
- 2 tsp baking soda
- 1 tsp baking powder
- 1 tsp salt
- 1 cup buttermilk
- 1/2 cup vegetable oil
- 2 large eggs
- 2 tsp vanilla extract
- 1 cup unsalted butter, softened
- 4 cups powdered sugar
- 1/2 cup unsweetened cocoa powder (for frosting)
- 1/4 cup heavy cream
- 1/2 cup Halloween sprinkles
Instructions
- Preheat oven to 350F (175C) and grease three round cake pans (8-inch, 6-inch, and 4-inch).
- Whisk together flour, sugar, cocoa powder, baking soda, baking powder, and salt in a large bowl.
- Add buttermilk, oil, eggs, and vanilla extract. Mix on medium speed until smooth.
- Divide batter among the three pans and bake for 25-35 minutes, or until a toothpick inserted in the center comes out clean.
- Cool cakes in pans for 10 minutes, then transfer to wire racks to cool completely.
- Beat softened butter and powdered sugar together, then add cocoa powder and heavy cream until fluffy.
- Place the 8-inch cake on a platter, spread a layer of frosting, and stack the 6-inch cake on top.
- Repeat the frosting layer and place the 4-inch cake on top.
- Frost the exterior of the cake with a rough, uneven application of buttercream to look like a weathered house.
- Press Halloween sprinkles into the frosting on the roof and around the base of the cake.
- Prep Time: 45 minutes
- Cook Time: 35 minutes
- Category: Dessert
- Method: Baking
- Cuisine: American