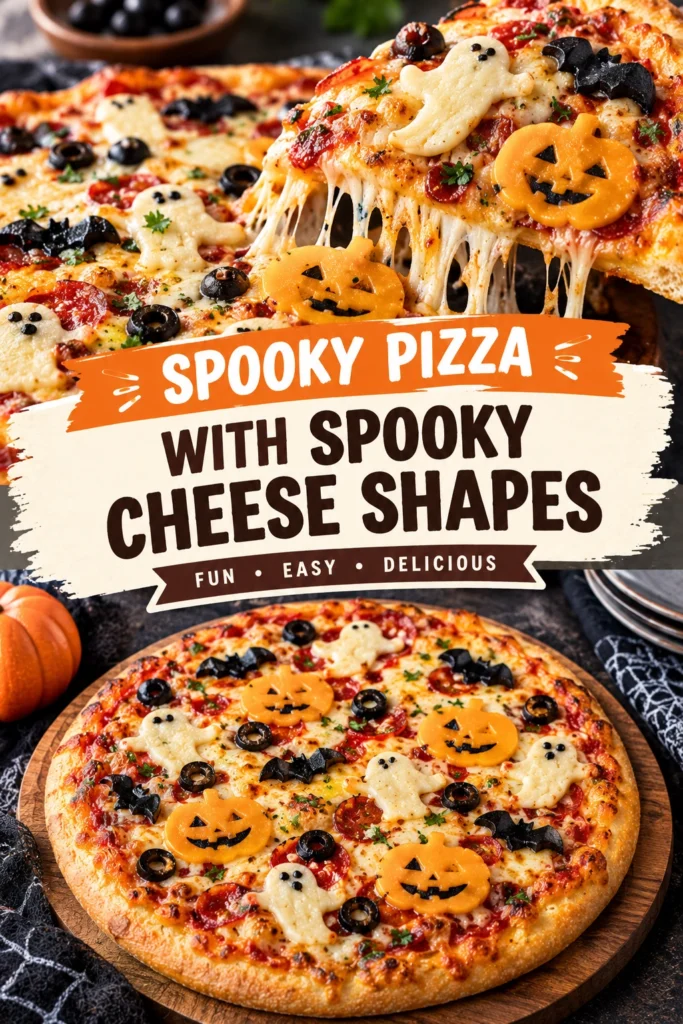
The cheese bubbles and browns at the edges, turning a simple circle of dough into a canvas for Halloween creativity. When the mozzarella finally melts around the shaped cut-outs, the spooky designs lock into place.
This recipe transforms a standard homemade pizza into a themed event using precise cheese shaping. It is a savory dinner that doubles as an activity for the whole family.
Many people enjoy this version because it moves beyond basic toppings to incorporate visual storytelling. The contrast between the deep red sauce and the pale, shaped cheese creates an immediate visual impact.
Unlike store-bought frozen pizzas, this version allows for complete control over the crust thickness and the quality of the cheese, which is vital for maintaining the shapes.
It is an ideal choice for parents hosting a Halloween party or for those wanting to make a regular weeknight dinner feel special for children.
The following guide provides the necessary steps to achieve crisp crusts and distinct, recognizable cheese figures.
- ●Why You’ll Love This Recipe
- ●A Brief Background / Why This Recipe Works
- ●Perfect For Halloween Family Dinners
- ●Main Ingredient Spotlight: Pizza Dough
- ●Secondary Ingredient Spotlight: Mozzarella Cheese
- ●Key Ingredients
- ●How to Make It
- ●Pro Tips
- ●Delicious Variations
- ●Best Ways to Serve
- ●Storage and Leftovers
- ●Frequently Asked Questions
- ●Why This Recipe Belongs in Your Weekly Rotation
- ●Final Thoughts
This pizza balances the comfort of a classic meal with the excitement of a holiday project.
- ●Interactive preparation that involves children in the kitchen
- ●Highly customizable toppings based on dietary preferences
- ●Visual appeal that makes themed dinners effortless
- ●Faster preparation than complex baked goods
- ●Uses simple pantry staples found in most kitchens
- ●Allows for creative expression through cheese shaping
- ●Satisfies cravings for a cheesy, salty dinner
- ●Works well as a main course or a party appetizer
The combination of salty cheese and tangy tomato sauce makes this a crowd-pleaser regardless of the occasion.
A Brief Background / Why This Recipe Works |
The success of this recipe relies on the structural integrity of the cheese. Using a firm, low-moisture mozzarella allows the shapes to hold their form during the initial stages of baking rather than melting into a single puddle.
The high heat of the oven quickly sets the crust and browns the cheese edges. This process creates a slight crust on the cheese shapes, which helps them stand out against the sauce.
This method is similar to the logic used in Pizza Skulls For Halloween Spooky Halloween Party Appetizers For Kids, where the focus is on the visual silhouette of the cheese and dough.
Perfect For Halloween Family Dinners |
This meal is designed for busy holidays where you want something impressive but manageable. It replaces the need for multiple small snacks by providing a filling meal that fits the theme.
For family dinners, it encourages teamwork. One person can roll the dough while others use small cutters to create ghosts, pumpkins, or bats out of cheese slices.
It also serves as a great bridge between a traditional meal and a party spread. Because it is a pizza, it is easy to slice into portions for guests of all ages.
Main Ingredient Spotlight: Pizza Dough |
The dough provides the essential foundation for the entire dish. A dough with a slightly higher protein content creates a sturdier base that can support the weight of the sauce and heavy cheese shapes without sagging in the middle.
The texture should be chewy on the inside and crisp on the bottom. If you prefer a lighter option, you can experiment with a High Protein Cottage Cheese Chicken Crust Pizza Delight for a different nutritional profile.
Secondary Ingredient Spotlight: Mozzarella Cheese |
Mozzarella is chosen for its superior melting properties and mild flavor. It provides the necessary stretch and gold-brown color that makes the shapes pop visually.
Low-moisture mozzarella is the best choice here because it contains less water. This prevents the sauce from becoming watery and ensures the shapes do not bleed into one another during the bake.
Fresh mozzarella can be used for a more authentic taste, but it requires slicing very carefully and blotting with a paper towel to remove excess moisture before shaping.
Key Ingredients |
Each component plays a role in the flavor and stability of the final spooky pizza.
- ●Pizza dough — the bread base that provides structure and chew
- ●Pizza sauce — a tangy tomato base that provides a red backdrop for the cheese
- ●Low-moisture mozzarella — the primary cheese used for both the base layer and the spooky shapes
- ●Olive oil — used to prevent the dough from sticking and to add a golden sheen to the crust
- ●Dried oregano — adds a classic savory aroma to the sauce
- ●Parmesan cheese — used for extra saltiness and a sharper flavor profile
How to Make It |
Follow these steps carefully to ensure your cheese shapes remain recognizable after they leave the oven.
- Prepare the oven and pan: Preheat your oven to 475F (245C). Place a baking sheet in the oven while it heats; a hot pan helps the bottom of the crust crisp up faster, preventing a soggy center.
- Roll the dough: Lightly flour your surface and roll the pizza dough into a circle or rectangle. Avoid rolling it too thin, as the dough needs enough substance to hold the toppings without tearing.
- Apply the sauce: Spread a thin, even layer of pizza sauce over the dough, leaving a half-inch border for the crust. If you apply the sauce too thickly, the moisture can seep into the dough and cause the cheese shapes to slide.
- Create the cheese base: Sprinkle a light layer of shredded mozzarella over the sauce. This acts as a “glue” that holds your spooky shapes in place so they do not shift during the baking process.
- Cut the spooky shapes: Using a block of low-moisture mozzarella, cut slices about 1/4 inch thick. Use small cookie cutters or a paring knife to create shapes like ghosts, bats, or skulls.
- Arrange the designs: Carefully place your cheese shapes on top of the shredded cheese base. Space them out slightly, as they will expand a small amount as they melt.
- Bake the pizza: Carefully slide the pizza onto the preheated baking sheet. Bake for 10 to 12 minutes, or until the crust is golden brown and the cheese shapes have melted but still retain their edges.
- Finish and cool: Remove the pizza from the oven and let it rest for 5 minutes. This allows the cheese to set, making it easier to slice without the shapes sliding off the dough.
1Small adjustments in technique can lead to a much more professional result.
- ●2Chill the cheese: Keep your cheese shapes in the refrigerator until the moment you place them on the pizza to prevent them from softening too quickly.
- ●3Avoid overloading: Do not put too many toppings under the shapes, as this creates an uneven surface that can distort the designs.
- ●4Use a pizza stone: If you have one, a pizza stone provides more consistent heat than a baking sheet for a crunchier crust.
- ●5Brush the crust: Apply a light coating of olive oil and garlic salt to the edges of the crust for better color and flavor.
- ●6Precise cutting: Use a very sharp knife for the shapes to avoid compressing the cheese, which can lead to uneven melting.
Delicious Variations |
You can adapt this recipe to suit different tastes or dietary needs.
- ●White Pizza Version: Swap the tomato sauce for a garlic ricotta spread to create “ghostly” white pizzas.
- ●Pepperoni Accents: Use sliced pepperoni as eyes for your cheese ghosts or as pupils for spooky cheese eyes.
- ●Veggie Spooks: Add black olives to create spider legs extending from the cheese shapes.
- ●Spicy Twist: Mix red pepper flakes into the sauce for a “hellfire” pizza effect.
- ●Pesto Base: Use basil pesto for a green, swamp-like appearance under the white cheese shapes.
These variations allow you to change the mood of the pizza from cute to creepy depending on your preference.
Best Ways to Serve |
Presentation is key for a themed meal like this.
- ●Serve on a dark wooden board to make the colors pop.
- ●Pair with a side of “blood-red” marinara for dipping the crusts.
- ●Add a side salad with purple cabbage and carrots for a colorful contrast.
- ●Serve alongside a spooky drink, such as sparkling cider with floating blueberries.
If you are serving a large group, consider making several smaller pizzas with different shapes on each one. This creates variety and allows guests to pick their favorite design.
For those who want something even more elaborate, you can coordinate this with other themed dishes. This pizza pairs well with Monster Spaghetti With Spooky Cheese Shapes Fun Halloween Dinner For Kids for a full-course spooky feast.
Storage and Leftovers |
Refrigerating
Place leftover pizza in an airtight container. It will stay fresh in the refrigerator for up to 3 to 4 days.
Reheating
To maintain the crust’s crispness, reheat slices in a toaster oven or a dry skillet over medium heat for 3 to 5 minutes. Avoid the microwave, as it makes the crust rubbery.
Freezing
Wrap individual slices tightly in foil and place them in a freezer bag. They can be stored for up to 2 months and reheated directly from frozen in the oven.
Frequently Asked Questions |
- ●Q: Why did my cheese shapes melt completely into the pizza?A: This usually happens if the cheese is too thin or if you used a high-moisture fresh mozzarella. Ensure your shapes are at least 1/4 inch thick and use low-moisture mozzarella, which holds its structure better under high heat.
- ●Q: Can I use store-bought dough for this recipe?A: Yes, store-bought dough works perfectly. Just make sure to let it come to room temperature for about 30 minutes before rolling, otherwise it will snap back and be difficult to shape into a circle.
- ●Q: What are the best shapes to cut for beginners?A: Ghosts are the easiest because they are simple organic shapes. Pumpkins are also straightforward—just cut a circle and add a small rectangle at the top for the stem. Always keep in mind that results can vary depending on your specific ingredients, equipment, and kitchen conditions, so taste as you go and adjust accordingly for the best outcome.
- ●Q: How do I stop the cheese from sliding off when I slice the pizza?A: The key is the base layer of shredded mozzarella and letting the pizza rest for 5 minutes after baking. This allows the melted cheese to firm up slightly, locking the shapes to the dough.
- ●Q: Can I make this pizza on a gluten-free crust?A: Absolutely. Most gluten-free crusts are denser than wheat crusts, which actually helps support the cheese shapes. Just follow the specific baking instructions for your chosen gluten-free brand. Feel free to experiment once you are comfortable with the base recipe — small tweaks to seasoning, cooking time, or ingredient ratios can personalise the dish to suit your taste.
- ●Q: Should I pre-bake the crust before adding the cheese shapes?A: For a very thin crust, a 5-minute pre-bake can prevent the center from becoming soggy. However, for standard thickness, baking everything together ensures the cheese and crust finish at the same time.
Why This Recipe Belongs in Your Weekly Rotation |
While the theme is Halloween, the core of this recipe is a high-quality homemade pizza. It teaches basic dough handling and heat management while providing a meal that children actually look forward to eating.
Incorporating themed meals into your routine encourages creativity in the kitchen. It turns a chore into a bonding experience, making the process of cooking as rewarding as the meal itself.
Because it is so easy to adapt, you can use this same technique for other holidays or events. Once you master the art of cheese shaping, you can create any design you imagine on a pizza base.
Final Thoughts |
This spooky pizza combines the reliability of a classic dinner with the playful energy of Halloween. the thickness of the mozzarella and the temperature of the oven, you can create a meal that looks as good as it tastes.
Whether you are hosting a party or simply want to surprise your kids, this recipe is a low-stress way to add a festive touch to your table. It requires no specialty equipment, only a bit of patience with the cheese cutters.
Gather your ingredients and start shaping your spooky designs for a memorable dinner tonight.
Spooky Pizza with Spooky Cheese Shapes
- Total Time: 32 minutes
- Yield: 1 pizza (4 servings) 1x
Description
A festive Halloween-themed pizza featuring creative cheese cut-outs on a classic mozzarella and tomato base. Perfect for kids and party guests.
Ingredients
- 1 lb pizza dough, room temperature
- 1/2 cup pizza sauce
- 2 cups low-moisture mozzarella cheese, shredded (for base)
- 8 oz block low-moisture mozzarella cheese (for shapes)
- 1 tablespoon olive oil
- 1 teaspoon dried oregano
- 2 tablespoons grated Parmesan cheese
Instructions
- Preheat the oven to 475F (245C) and place a baking sheet inside to heat up.
- Roll out the pizza dough on a floured surface into a 12-inch circle.
- Spread 1/2 cup of pizza sauce evenly over the dough, leaving a 1/2 inch border.
- Sprinkle shredded mozzarella over the sauce to create a stable base layer.
- Slice the mozzarella block into 1/4 inch thick slabs and use cutters or a knife to create spooky shapes like ghosts or bats.
- Arrange the cheese shapes on top of the shredded cheese base.
- Carefully transfer the pizza onto the preheated baking sheet.
- Bake for 10 to 12 minutes until the crust is golden and cheese is melted.
- Allow the pizza to rest for 5 minutes before slicing.
- Prep Time: 20 minutes
- Cook Time: 12 minutes
- Category: Dinner
- Method: Baking
- Cuisine: American