Introduction |
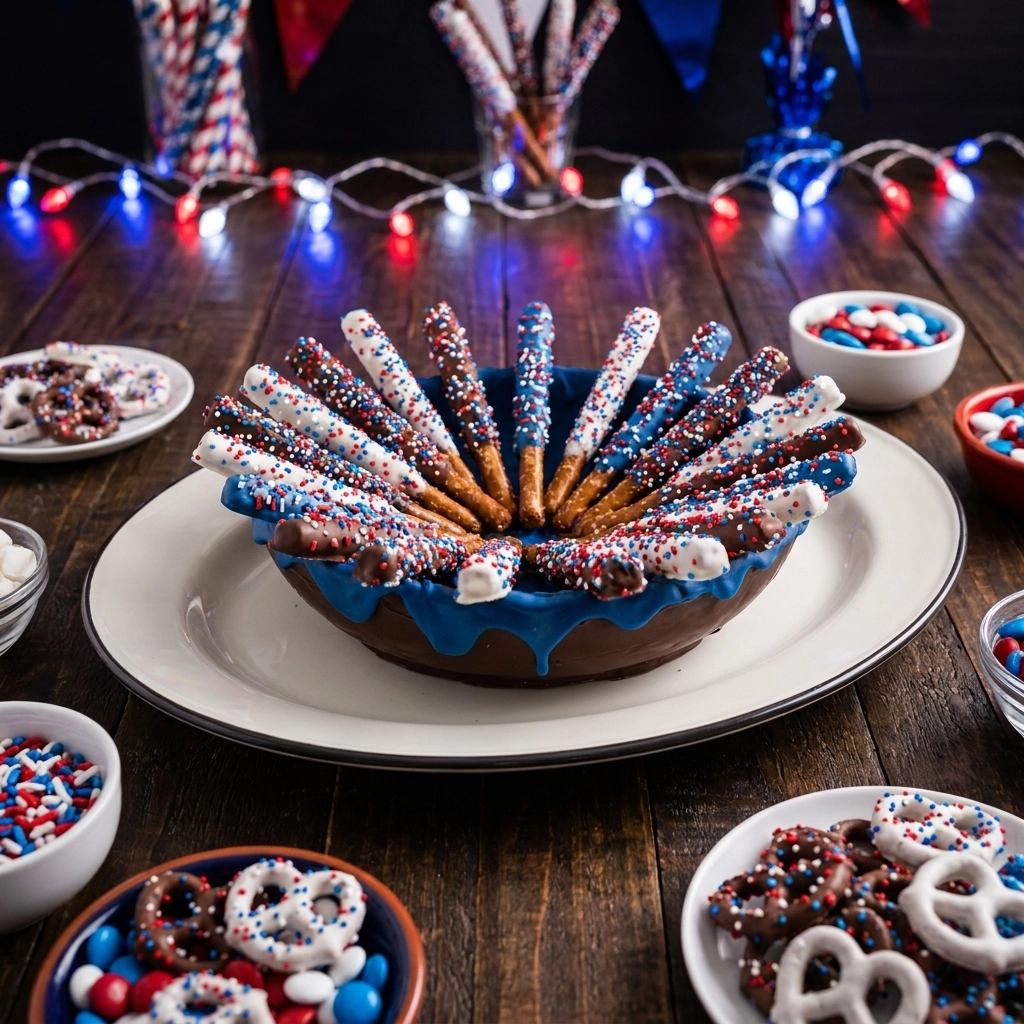
Hosting a Fourth of July bash demands a dessert that balances the heat of the summer with a satisfying, salty crunch. I spent years trying to find a treat that looked professional enough for a display table but required zero actual baking, leading me to the timeless appeal of chocolate-dipped pretzels.
I almost gave up on this recipe until I discovered that using a microwave-safe glass bowl instead of plastic prevents the chocolate from overheating and seizing. That one technical adjustment transformed a messy, clumped disaster into a smooth, glossy coating that clings perfectly to the salty rods.
- ●The perfect equilibrium of savory salt and rich, sweet cocoa.
- ●Zero oven time required, making it ideal for hot July afternoons.
- ●Customizable patriotic colors to match any holiday theme.
- ●Kid-friendly assembly that involves the whole family in the kitchen.
- ●Long shelf life compared to cupcakes or cream-based desserts.
Essential Ingredients |
Pretzel Rods provide the structural foundation and a deep, toasted wheat aroma; use a 24-count pack of thick-cut rods for maximum stability.
Semi-Sweet Chocolate delivers a dark, glossy finish and a bittersweet flavor profile; look for high-quality melting wafers to avoid the need for extra oil.
White Chocolate adds a creamy, milky sweetness and a bright white canvas for coloring; use a small 10-ounce bag for precise melting.
Red and Blue Candy Melts offer the vivid, saturated hues required for the patriotic theme; choose a brand with a high cocoa butter content for a smoother flow.
Rainbow Sprinkles contribute a playful texture and vibrant pops of color; a mixture of red, white, and blue sequins adds the best visual impact.
 Let’s Make it Together |
- To prevent the chocolate from sticking to the counter, line a large baking sheet with parchment paper or a silicone mat before you begin.
- To ensure the chocolate melts evenly without scorching, heat each type of candy melt in 30-second bursts in the microwave, stirring thoroughly between intervals.
- To achieve a clean dip, hold the pretzel rod and submerge it halfway into the melted chocolate, rotating it slowly to coat the sides.
- To remove excess chocolate and create a sleek finish, gently shake the rod over the bowl for two seconds before lifting it out.
- To apply decorative accents before the chocolate sets, immediately sprinkle the red, white, and blue toppings onto the wet coating.
- To lock in the design and prevent smudging, place the rods upright in a narrow glass or lay them flat on the parchment paper for 20 minutes.
Avoid using water near your melting chocolate as a single drop will cause the entire batch to seize.
Stick to candy melts rather than traditional bars for a more consistent melt and a sharper color.
Ensure your pretzel rods are at room temperature to prevent the chocolate from cracking upon contact.
Keep the chocolate warm for 10 seconds if it begins to thicken during dipping.
Work in small batches to ensure the colors remain distinct and do not bleed into each other.
Perfecting the Cooking Process |
Precision in temperature is the difference between a professional glaze and a grainy mess. Chocolate begins to seize when it hits approximately 120°F, which is why short bursts of microwave energy are non-negotiable. 30 seconds, you distribute the heat manually, preventing the center from burning while the edges remain solid.
Timing the application of toppings is equally critical. You have a window of roughly 15 to 45 seconds after dipping before the chocolate creates a skin. Once that skin forms, sprinkles will simply bounce off the surface rather than adhering. This chemical transition occurs rapidly in humid environments, so work quickly or use a cool-air fan to set the chocolate faster.
Add Your Touch |
But here’s the thing: you aren’t limited to just chocolate. Try substituting the white chocolate with a bright lemon-flavored coating or a salted caramel melt for a more sophisticated flavor profile that cuts through the sweetness.
That’s exactly why adding a layer of crushed pretzels or toasted coconut to the wet chocolate can add a second dimension of texture. A drizzle of contrasting colors across the finished rods adds a professional, artisanal look to the platter.
Storing & Reheating |
Keep these treats in an airtight container in a cool, dry place to prevent the chocolate from blooming or sweating. If your kitchen is particularly hot, the refrigerator is a safer bet, though you must seal them tightly to avoid absorbing odors from other foods.
Reheating is completely unnecessary and discouraged for this recipe. Applying heat will simply melt the decorative elements and destroy the snap of the pretzel, so serve them chilled or at room temperature for the best experience.
1Use a toothpick to flick away any stray chocolate drips from the bottom of the rod before they harden.
2Dip the rods halfway to leave a clean handle for guests to hold without getting chocolate on their fingers.
3Sift your sprinkles to remove any oversized clumps that might make the rod tilt on the tray.
4Warm your hands slightly before handling the rods to prevent cold spots from affecting the chocolate flow.
5Test the consistency of the melt with a fingertip; it should feel like heavy cream, not thick paste.
FAQ |
- ●Q: Why did my chocolate get chunky and thick instead of smooth?A: This happens when chocolate is overheated or exposed to moisture. If it becomes chunky, you can try adding a teaspoon of coconut oil and stirring vigorously, but if it has seized due to water, it cannot be saved.
- ●Q: Can I use regular chocolate chips instead of candy melts?A: You can, but chocolate chips contain stabilizers that make them thicker when melted. To get the same smooth flow as candy melts, you will need to add a small amount of shortening or vegetable oil to the mix.
- ●Q: How long do these stay fresh for a party?A: When stored in an airtight container, these rods stay fresh and crunchy for up to two weeks. Avoid keeping them in the fridge for too long, as the humidity can cause the sugar to crystallize on the surface.
- ●Q: What is the best way to get perfectly straight lines of chocolate?A: Use a steady hand and dip the rod vertically. The key is to lift the rod straight up and give it a gentle, rhythmic shake to let gravity pull the excess chocolate away from the bottom edge.

Festive 4th of July Chocolate Covered Pretzel Rods
- Total Time: 30 minutes
- Yield: 24 rods 1x
Description
Salty pretzel rods dipped in vibrant red, white, and blue chocolate for a patriotic and delicious holiday treat.
Ingredients
- 24 large pretzel rods
- 10 oz semi-sweet chocolate melting wafers
- 10 oz white chocolate melting wafers
- 10 oz red candy melts
- 10 oz blue candy melts
- Red, white, and blue sprinkles
Instructions
- Line a baking sheet with parchment paper.
- Melt chocolate and candy melts in 30-second increments in the microwave.
- Dip pretzel rods halfway into the melted chocolate.
- Shake off excess chocolate and immediately add sprinkles.
- Place rods on the parchment paper.
- Let set for 20 minutes before serving.
- Prep Time: 20 minutes
- Cook Time: 10 minutes
- Category: Dessert
- Method: Dipping
- Cuisine: American