Ever wondered why we love eating things that look like ancient undead monsters?
Imagine a chilly October evening, the wind whistling through skeletal branches and a flickering jack-o’-lantern guarding your porch. The house smells like cinnamon and mystery, making it the absolute peak moment to slide a tray of cookies into the oven.
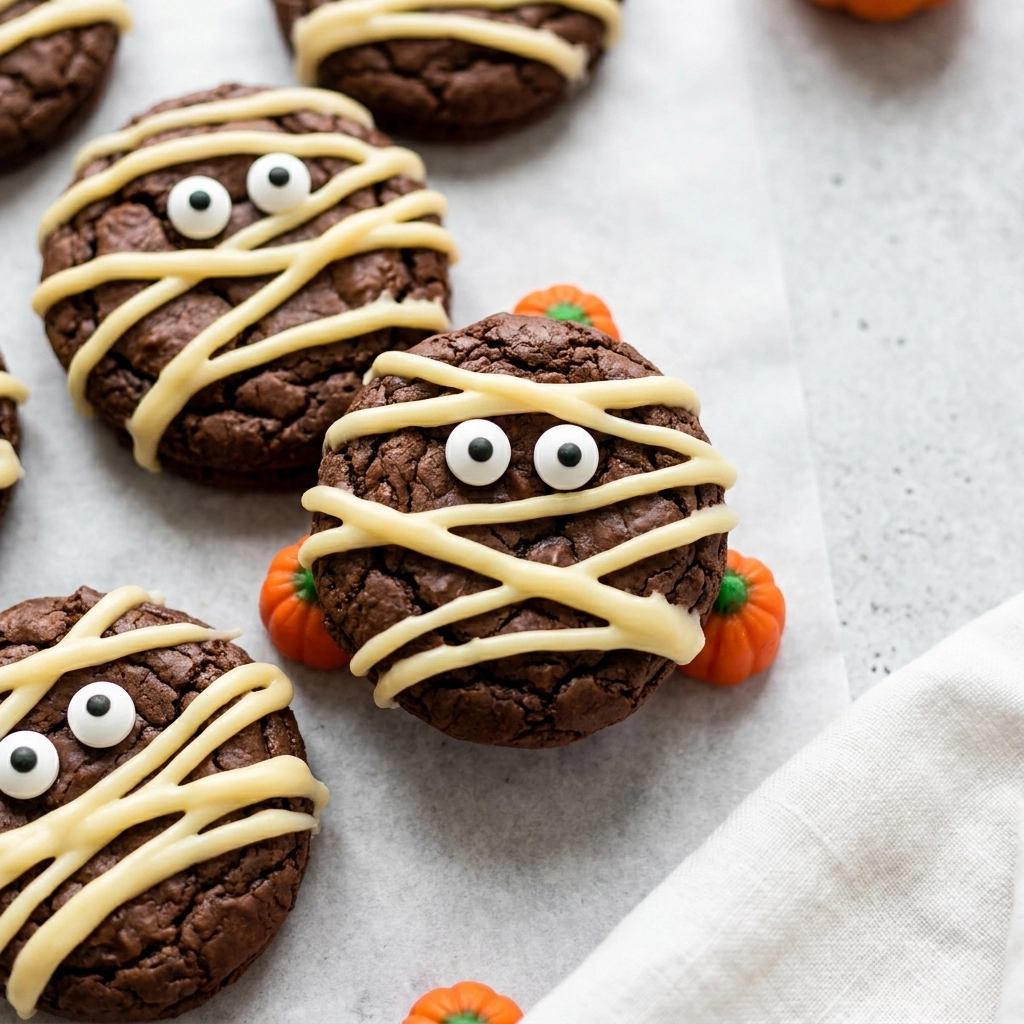
These Mummy Cookies are a whimsical blend of soft, buttery goodness topped with a chaotic mess of white icing that somehow looks intentional. They are basically the edible equivalent of a cozy Halloween sweater.
Most people adore them because they manage to be both adorable and slightly creepy at the same time. It is a rare balance that satisfies both the toddler and the cynical teenager.
Unlike those store-bought frosted cookies that taste like sweetened cardboard, these are made from scratch with real butter. Your guests will actually taste the quality instead of just seeing the gimmick.
This recipe is a dream for parents who want to involve the kids in the kitchen without causing a total disaster. It turns baking into a craft project that you can actually eat.
Let us dive into the ingredients before your kitchen turns into a haunted house. Spooktacular Halloween Recipe Ideas To Try Out Now Easy Halloween Party Treats
- ●Why You’ll Love This Recipe
- ●A Brief Background / Why This Recipe Works
- ●Perfect For Spooky Parties and Family Traditions
- ●Main Ingredient Spotlight: Butter
- ●Secondary Ingredient Spotlight: Powdered Sugar
- ●Key Ingredients
- ●How to Make It
- ●Pro Tips
- ●Delicious Variations
- ●Best Ways to Serve
- ●Storage and Leftovers
- ●Frequently Asked Questions
- ●Why This Recipe Belongs in Your Weekly Rotation
- ●Final Thoughts
There are a million ways to make a dessert, but few are as visually satisfying as these wrapped monstrosities. Here is why they deserve a spot on your cooling rack:
- ●The visual appeal is instant and highly shareable on social media.
- ●Baking them is a low-stress way to introduce children to measuring and mixing.
- ●The soft texture ensures they don’t crumble while you’re adding the icing.
- ●You only need basic pantry staples to achieve a professional look.
- ●They pair perfectly with a cold glass of milk or hot cider.
- ●Customizing the facial expressions allows for a lot of creative humor.
- ●The prep time is minimal compared to the high impact they have on a dessert table.
- ●They are far more delicious than any pre-packaged Halloween cookie.
- ●The icing acts as a sweet glaze that locks in the cookie’s moisture.
Basically, these cookies do all the heavy lifting for your party decor while tasting like a hug from a grandma who happens to enjoy the occult.
A Brief Background / Why This Recipe Works |
The magic of the mummy cookie lies in the contrast between the golden-brown base and the stark white piping. By using a sturdy yet soft sugar cookie, we create a canvas that can support the weight of the royal icing without bending or breaking.
Chemistry plays a role here too, as the specific ratio of butter to flour prevents the cookies from spreading too much into flat pancakes. This keeps our mummies plump and rounded, giving them a more three-dimensional, character-like appearance.
Who doesn’t love a treat that doubles as a piece of art? The simplicity of the design means you don’t need a culinary degree to make them look great, just a steady hand and a bit of patience.
This combination of flavor and fun ensures that the cookies disappear faster than a ghost in a drafty hallway. Halloween Pretzels Youll Love Spooky Easy Recipe Cute Halloween Treats
Perfect For Spooky Parties and Family Traditions |
Busy weeknights often feel like a battle, but these cookies are the perfect way to wind down on a Friday evening before the weekend chaos begins. They can be prepped in bulk, allowing you to focus on the actual party rather than hovering over a stove.
Family dinners during the Halloween season benefit greatly from a themed dessert. These cookies bring a sense of playfulness to the table that encourages kids to actually enjoy the process of baking.
Holidays are all about memory-making, and the annual “Mummy Bake-Off” is a tradition that sticks. Whether you are hosting a neighborhood bash or a quiet night in, these treats fit every vibe perfectly.
Main Ingredient Spotlight: Butter |
Butter is the unsung hero of this recipe, providing that rich, velvety mouthfeel and a golden hue that makes the cookies look professional. Its fat content ensures the cookies remain tender and prevents them from becoming overly dry or brittle.
When you use high-quality salted butter, you add a subtle depth that balances the sweetness of the icing. It creates a flavor profile that is nostalgic and comforting, reminding everyone of classic bakery treats.
Secondary Ingredient Spotlight: Powdered Sugar |
Powdered sugar is what allows us to create that thick, pipeable icing that holds its shape. Unlike granulated sugar, the fine powder dissolves instantly, resulting in a smooth, glossy finish that looks like actual bandages.
It provides the structural integrity needed for the “wraps” to sit on top of the cookie without sliding off. Without it, your mummies would just look like sad, melted puddles of sugar.
It is the bridge between a simple cookie and a decorative masterpiece. Spooktacular Halloween Popcorn Recipe For Fun Treats Easy Halloween Snack Mix
Key Ingredients |
Gather these items from your pantry to begin your undead creations:
- ●Unsalted Butter — provides the essential richness and tender crumb.
- ●Granulated Sugar — ensures the edges get that perfect golden crisp.
- ●Egg — binds the dough together and adds a bit of lift.
- ●Vanilla Extract — gives the cookies a warm, aromatic fragrance.
- ●All-Purpose Flour — forms the structural base of the cookie.
- ●Baking Powder — helps the mummies rise slightly for a plump look.
- ●Powdered Sugar — used for the bright white mummy bandages.
- ●Milk — thins the icing to the perfect piping consistency.
- ●Candy Eyes — the final touch to bring your monsters to life.
 How to Make It |
Follow these steps carefully to avoid any baking catastrophes. Just remember, if you mess up the icing, you can just call it a “zombie mummy” and no one will know.
- Cream the butter: Beat the softened butter and granulated sugar together until the mixture is pale and fluffy. This incorporates air into the dough, which prevents the cookies from becoming dense bricks. Pro tip: Use room temperature butter to avoid lumps in your batter.
- Mix the wet ingredients: Whisk in the egg and vanilla extract until fully combined. Ensure you don’t overbeat at this stage, or you might incorporate too much air, causing the cookies to puff up and then collapse.
- Combine the dry components: Fold in the flour and baking powder slowly. Use a spatula to gently incorporate the flour until no white streaks remain, as overmixing develops gluten and makes the cookies tough.
- Scoop the dough: Roll the dough into small, uniform balls about one inch in diameter. Place them on a parchment-lined sheet with plenty of space between them so they don’t merge into one giant mummy mega-cookie. Pro tip: Use a cookie scoop for perfectly consistent sizes across the whole batch.
- Bake the bases: Slide the tray into the oven and bake until the edges are just barely golden. Avoid overbaking, as the cookies will continue to firm up once they hit the cooling rack.
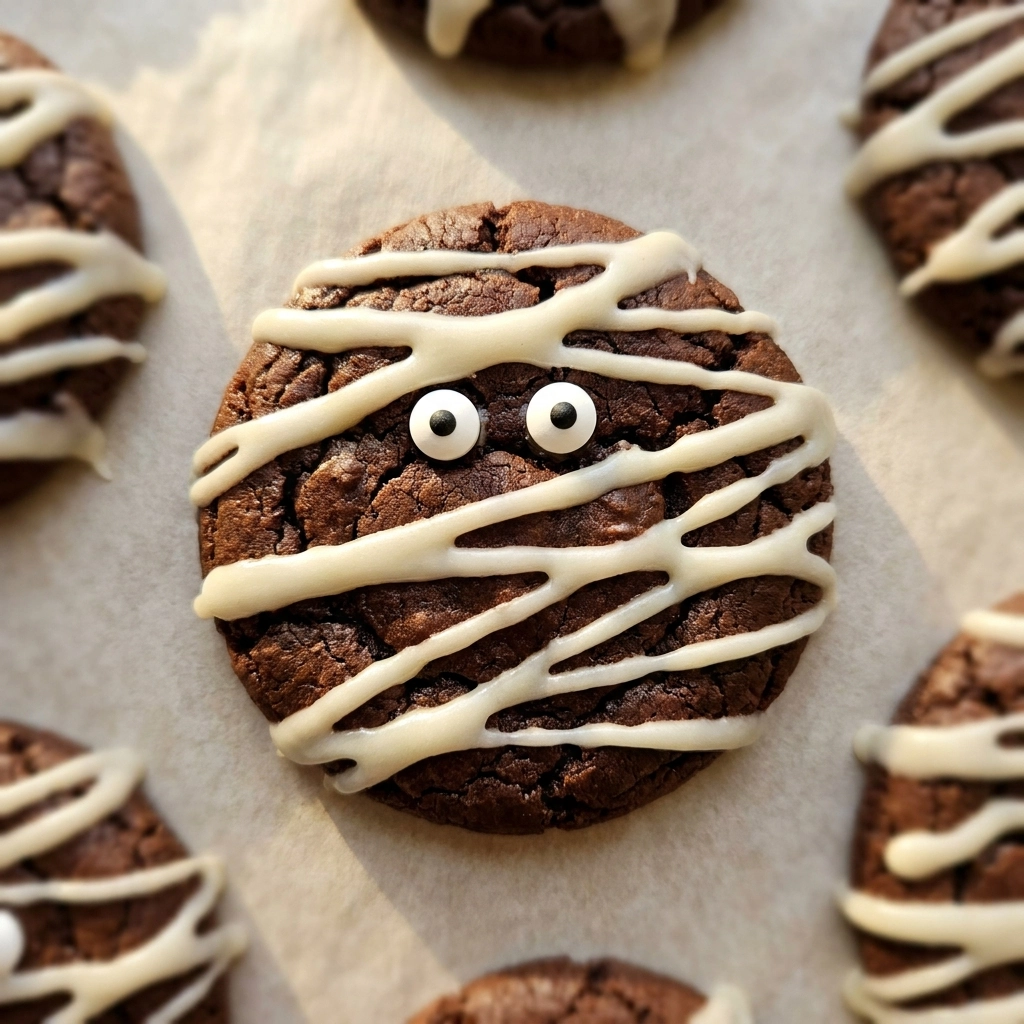
- Prepare the icing: Whisk the powdered sugar and milk together until the consistency is like thick toothpaste. If it’s too runny, the bandages will bleed; if it’s too thick, you’ll tear the cookie.
- Pipe the bandages: Squeeze the icing in haphazard, overlapping horizontal lines across the cookie. Leave a small gap for the eyes to peek through, creating that classic mummy expression. Pro tip: Use a piping bag with a small round tip for the cleanest lines.
- Add the eyes: Press two candy eyes into the gap you left in the icing while it is still wet. This ensures they stick firmly and don’t roll off during transport.
1To take your cookies from “home-made” to “bakery-level,” keep these secrets in mind:
- ●2Chill the dough: Let your rolled dough balls sit in the fridge for 30 minutes before baking to stop them from spreading.
- ●3Freeze the tray: Putting your baking sheet in the freezer for 5 minutes before adding dough can help create a crispier bottom.
- ●4Test the icing: Pipe a small line on wax paper first to check if the consistency is right before touching your cookies.
- ●5Use a steady hand: Keep your wrist relaxed while piping to get those natural, slightly wobbly mummy wraps.
- ●6Avoid heat: Do not ice the cookies until they are completely cold, or the icing will melt into a sugary soup. Spooky Halloween Pretzels Youll Love Easy Fun Treats Halloween Dessert Ideas
Delicious Variations |
While the classic vanilla is great, you can easily pivot these flavors to suit your mood:
- ●Chocolate Mummies: Swap a portion of the flour for cocoa powder for a rich, dark base.
- ●Pumpkin Spice: Add a teaspoon of pumpkin pie spice to the dough for a seasonal twist.
- ●Almond Extract: Replace the vanilla with almond extract for a more sophisticated, nutty flavor.
- ●Colored Bandages: Add a drop of neon green or purple food coloring to the icing for alien mummies.
- ●Maple Glaze: Use maple syrup in the icing for a cozy, autumn-inspired sweetness.
No matter which path you choose, the visual of the wrapped mummy remains the star of the show.
Best Ways to Serve |
Presentation is everything when it comes to Halloween treats. You want your cookies to look like they were plucked from a haunted tomb.
- ●Arrange them on a slate platter with faux cobwebs draped over the edges.
- ●Serve them alongside a bowl of dark purple grapes or blackberries for a gothic color palette.
- ●Place them in individual mini-cauldrons for a cute party favor.
For a complete experience, serve these cookies with a warm beverage like apple cider or a spiced latte. The heat of the drink complements the sugary snap of the icing perfectly.
If you are hosting a larger crowd, try pairing these with savory options to balance the sweetness. Spooktacular Halloween Sandwiches For Fun Family Meals Easy Halloween Lunch Ideas
Storage and Leftovers |
Refrigerating
Store your cookies in an airtight container in the fridge for up to 5 days. Ensure the icing is completely hardened before stacking them, or you will end up with a mummy-sandwich that looks like a disaster.
Reheating
Do not reheat these cookies if they have icing, as the sugar will melt. If you are baking plain cookies first, a quick 5-second zap in the microwave can restore that “just-baked” softness.
Freezing
Freeze unbaked dough balls on a tray for 2 hours, then transfer them to a freezer bag for up to 3 months. Bake them straight from the freezer, adding an extra 2 minutes to the cook time. Warning: Never freeze iced cookies, as the icing can crack or develop a strange texture upon thawing.
Frequently Asked Questions |
- ●Q: Can I make these cookies vegan?A: Yes, you can substitute the butter with a high-quality plant-based butter stick and replace the egg with a flax egg or commercial egg replacer. Ensure your candy eyes are also vegan-certified to keep the recipe consistent for all your guests.
- ●Q: Why did my icing run all over the cookie?A: This usually happens because too much milk was added to the powdered sugar. To fix this, simply whisk in more powdered sugar one tablespoon at a time until the mixture is thick enough to hold a peak on its own.
- ●Q: How do I prevent the cookies from spreading too much?A: The best way to avoid “pancake cookies” is to chill your dough in the refrigerator for at least 30 minutes before baking. This slows down the melting of the butter, allowing the cookies to maintain their round, plump shape.
- ●Q: Can I use a different type of flour?A: While all-purpose flour is recommended for the best structure, you can use a 1:1 gluten-free flour blend. Be aware that gluten-free cookies may be slightly more fragile, so handle them gently when applying the icing bandages.
- ●Q: What is the best way to pipe the lines if I don’t have a piping bag?A: You can put your icing into a sturdy Ziploc bag and snip a very small corner off. This works just as well as a professional bag and is much easier to clean up afterward.
Why This Recipe Belongs in Your Weekly Rotation |
While Halloween only happens once a year, the joy of baking these treats is timeless. They teach patience, creativity, and the importance of not taking your food too seriously.
Moreover, the basic sugar cookie base is incredibly versatile. Once you master this, you have the foundation for countless other seasonal designs throughout the year.
Integrating a bit of whimsy into your kitchen routine keeps cooking from feeling like a chore. It transforms a standard dessert into an activity that brings people together. Savory Carrot Cake Oatmeal Cookies Recipe Youll Love
Final Thoughts |
These Mummy Cookies combine a buttery, melt-in-your-mouth base with a playful, decorative icing that captures the spirit of Halloween perfectly. They are simple to assemble but produce a result that looks impressive on any dessert table.
Whether you are looking to entertain the kids or want to impress your friends at a party, these treats provide the perfect balance of taste and theme. They prove that you don’t need a professional kitchen to make something that looks like it came from a boutique bakery.
Grab your apron, gather your candy eyes, and start creating your own delicious army of undead sweets today!

Spooktacular Halloween Mummy Cookies You’ll Love to Bake
- Total Time: 32 minutes
- Yield: 24 cookies 1x
Description
A delightful and spooky sugar cookie decorated to look like little mummies. Perfectly sweet, buttery, and fun for the whole family to decorate.
Ingredients
- 1/2 cup unsalted butter, softened
- 3/4 cup granulated sugar
- 1 large egg
- 1 tsp vanilla extract
- 2 cups all-purpose flour
- 1 tsp baking powder
- 1/4 tsp salt
- 2 cups powdered sugar
- 2–3 tbsp milk
- 12–24 candy eyes
Instructions
- Preheat oven to 350°F (175°C) and line a baking sheet with parchment paper.
- Cream together softened butter and granulated sugar until light and fluffy.
- Beat in the egg and vanilla extract until well combined.
- Slowly stir in flour, baking powder, and salt until a soft dough forms.
- Roll dough into 1-inch balls and place on the baking sheet 2 inches apart.
- Bake for 10-12 minutes or until edges are lightly golden.
- Allow cookies to cool completely on a wire rack.
- Mix powdered sugar and milk until a thick, pipeable icing forms.
- Pipe overlapping white lines across the cookies, leaving a gap for eyes.
- Place two candy eyes into the gap while icing is still wet.
- Prep Time: 20 minutes
- Cook Time: 12 minutes
- Category: Dessert
- Method: Baking
- Cuisine: American