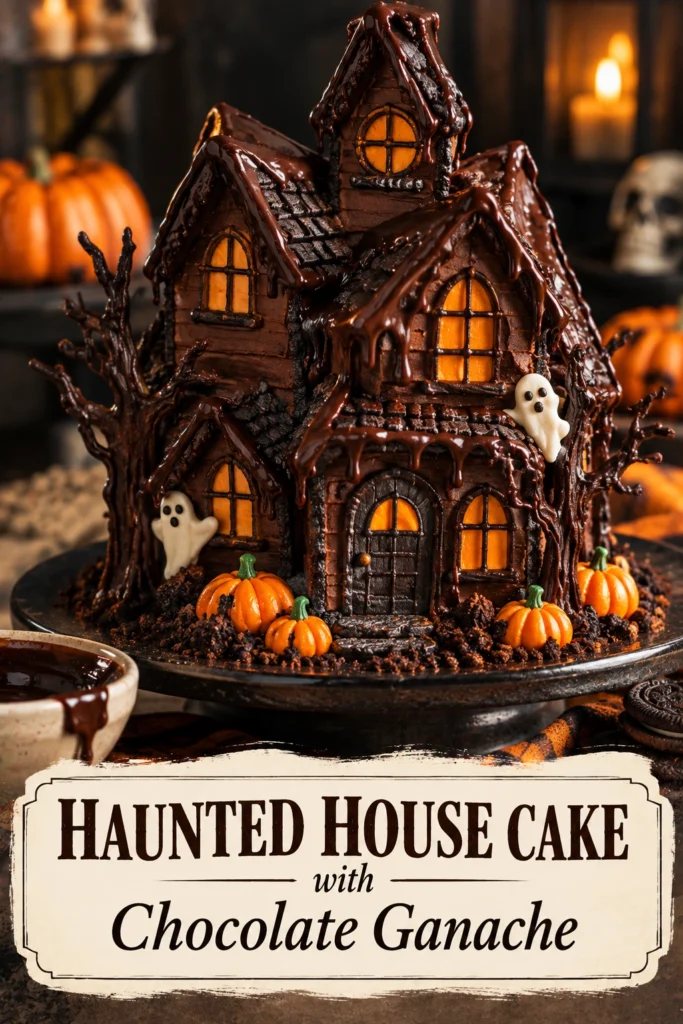
Expect a towering, structurally sound chocolate cake with a dense, moist crumb and a glossy, velvet-like finish. This dessert balances the visual thrill of a spooky silhouette with the deep richness of high-quality cocoa.
This recipe creates a tiered haunted house structure coated in a dark chocolate ganache. It serves as both a sculptural centerpiece and a decadent treat for guests.
Readers appreciate this cake because it allows for creative architectural expression without requiring professional pastry skills. The stability of the cake layers makes it reliable for stacking.
The uniqueness lies in the contrast between the jagged, “ruined” edges of the house and the smooth, reflective surface of the ganache.
Unlike store-bought cakes that often rely on sugary buttercream and stabilizers, this version uses a ganache that provides a cleaner, more intense chocolate flavor profile.
This project is a great fit for home bakers who enjoy thematic presentations and those hosting autumn gatherings or costume parties.
Review the components and techniques below to build your own edible manor.
- ●Why You’ll Love This Recipe
- ●A Brief Background / Why This Recipe Works
- ●Perfect For Spooky Celebrations and Autumn Parties
- ●Chocolate Spotlight
- ●Heavy Cream Spotlight
- ●Key Ingredients
- ●How to Make It
- ●Pro Tips
- ●Delicious Variations
- ●Best Ways to Serve
- ●Storage and Leftovers
- ●Frequently Asked Questions
- ●Why This Recipe Belongs in Your Weekly Rotation
- ●Final Thoughts
This cake offers a combination of structural reliability and intense flavor, making it a standout for any themed event.
- ●Strong cake layers that support stacking without collapsing.
- ●A rich ganache that hides imperfections in the carving.
- ●A deep cocoa flavor that appeals to adults and children.
- ●Customizable heights and shapes for a unique house design.
- ●A glossy finish that looks professional and striking.
- ●The ability to use various candies for eerie decorations.
- ●A moist texture that stays fresh for several days.
- ●A cohesive flavor profile focused on dark chocolate.
The result is a dessert that satisfies the craving for chocolate while acting as a visual conversation piece.
A Brief Background / Why This Recipe Works |
The success of a themed cake depends on the ratio of moisture to structure. A cake that is too soft will slump under the weight of the upper tiers, while a cake that is too dry will crumble when carved into jagged shapes.
The use of high-fat cream in the glaze creates a luxurious mouthfeel that balances the bitterness of the dark cocoa. This balance ensures the cake tastes as sophisticated as it looks.
Perfect For Spooky Celebrations and Autumn Parties |
This cake is ideal for hosted Halloween events where a visual centerpiece is required. Its towering nature makes it a focal point on a dessert table, paired well with Chocolate Halloween Cake Elegant Spooky Fun For Adults Adult Halloween Dessert for a coordinated look.
It also works for family-oriented autumn gatherings where children can help with the final decorating phase. The process of adding the ganache and placing the candy “rubble” is an engaging activity for all ages.
For those who enjoy more traditional chocolate options, this can be served alongside a Decadent Caramel Chocolate Cake Best Moist Chocolate Cake With Salted Caramel to provide a variety of flavors.
Chocolate Spotlight |
Dark chocolate is the foundation of this recipe, providing both the structure of the cake and the sheen of the glaze. It offers a complex bitterness that prevents the dessert from becoming cloying.
High-cocoa content chocolate creates a firmer ganache, which is essential for the cake to hold its shape at room temperature. This prevents the house from “melting” during the party.
Heavy Cream Spotlight |
Heavy cream is the emulsifier that transforms chopped chocolate into a pourable ganache. It adds a creamy, smooth texture that softens the intensity of the dark cocoa.
The high fat content in the cream ensures a glossy finish. When heated and combined with chocolate, it creates a stable emulsion that sets firmly but remains tender to the bite.
Key Ingredients |
These components work together to create a sturdy yet tender cake with a professional finish.
- ●All-purpose flour — provides the necessary structure for stacking and carving.
- ●Cocoa powder — delivers a deep, earthy chocolate base.
- ●Granulated sugar — adds sweetness and helps retain moisture.
- ●Baking soda — ensures the cake rises and creates a light crumb.
- ●Eggs — act as a binder to hold the cake layers together.
- ●Buttermilk — adds tanginess and keeps the cake moist.
- ●Semi-sweet chocolate — the primary component for the ganache glaze.
- ●Heavy cream — creates the smooth, pourable consistency of the glaze.
How to Make It |
Follow these steps to ensure your cake is structurally sound and visually striking.
- Prepare the cake layers: Preheat the oven and grease multiple round cake pans. Sift the dry ingredients together to remove lumps, then whisk in the wet ingredients until smooth. Bake until a toothpick comes out clean, ensuring you do not overbake, which would make the cake too crumbly for carving.
- Cool and level: Allow the cakes to cool completely in the pan before transferring them to a wire rack. Use a serrated knife to slice off the domed tops of each layer, creating flat surfaces. This is critical for stability when stacking tiers.
- Stack and carve: Place the largest layer at the bottom and stack subsequent smaller layers on top using a layer of frosting or ganache as glue. Use a knife to carve jagged edges or a slanted roofline into the sides of the cake to create the “ruined” haunted house effect.
- Prepare the ganache: Chop the chocolate into small, uniform pieces and place them in a heat-proof bowl. Heat the heavy cream until it just begins to simmer, then pour it over the chocolate. Let it sit for five minutes before whisking slowly from the center outward until glossy.
- Coat the house: Place the carved cake on a wire rack over a baking sheet. Pour the warm ganache over the top, allowing it to drip naturally down the jagged sides. This covers any carving mistakes and gives the cake a unified, dark appearance.
- Add the details: Once the ganache has set slightly, add decorations. Use crushed chocolate cookies for “dirt,” grey frosting for “cobwebs,” and small candies for windows or doors. Avoid adding heavy ornaments too early, as they may slide off the glaze.
1Use these techniques to refine the look and taste of your haunted house.
- ●2Chill before carving: Refrigerate the cake layers for an hour before carving; cold cake crumbs less and holds sharper edges.
- ●3Strain the ganache: Pass the finished glaze through a fine-mesh sieve to remove any undissolved chocolate bits.
- ●4Use a cake board: Build the house on a sturdy cake board to make transporting the heavy structure safer.
- ●5Avoid boiling cream: Do not let the cream reach a rolling boil, as this can separate the fat and cause the ganache to break.
- ●6Room temperature ingredients: Ensure eggs and buttermilk are at room temperature to create a smooth, well-emulsified batter.
Delicious Variations |
Adjust the flavors or dietary needs of your guests with these modifications.
- ●Raspberry Core: Fill the layers with raspberry jam to add a tart contrast to the rich chocolate.
- ●White Chocolate Ghosts: Use a white chocolate ganache for a “ghostly” white house instead of dark chocolate.
- ●Espresso Infusion: Add a tablespoon of instant espresso powder to the cake batter to deepen the chocolate flavor.
- ●Gluten-Free Base: Substitute all-purpose flour with a high-quality 1:1 gluten-free blend, similar to the approach in The Ultimate Decadent Flourless Chocolate Cake Easy Gluten Free Dessert
- ●Orange Zest: Fold orange zest into the batter for a citrusy, autumnal twist that pairs well with dark chocolate.
These variations allow you to tailor the cake to your specific preference for sweetness or acidity.
Best Ways to Serve |
Presentation is key for a thematic cake of this nature.
- ●Place the cake on a black platter to make the dark ganache pop.
- ●Surround the base with dry ice for a smoking, foggy effect.
- ●Serve with a side of fresh berries to cut through the richness.
- ●Pair with a strong coffee or a cold glass of milk.
When slicing, use a hot knife dipped in warm water and wiped dry between cuts. This ensures the ganache does not smear across the moist interior of the cake.
For a larger crowd, slice the cake into thin wedges to ensure there are enough portions for everyone. The density of the cake means a small slice is quite filling.
Storage and Leftovers |
Refrigerating
Store the cake in an airtight container or under a cake dome in the refrigerator for up to 5 days. The ganache will firm up, which helps maintain the house’s shape.
Reheating
Do not reheat the entire cake, as this will melt the ganache. Instead, allow individual slices to sit at room temperature for 30 minutes before eating to restore the texture.
Freezing
Wrap individual unfrosted layers in plastic wrap and foil for up to 3 months. Thaw in the refrigerator overnight before assembling and glazing the cake.
Frequently Asked Questions |
- ●Q: Why did my ganache separate or look grainy?A: Separation usually happens if the cream was boiled too vigorously or if the chocolate was overheated. To fix this, carefully whisk in a teaspoon of room-temperature cream or use an immersion blender to re-emulsify the fats into a smooth glaze.
- ●Q: How do I stop the cake layers from sliding?A: Use a small dollop of frosting or a bit of melted chocolate between each layer to act as an adhesive. For very tall houses, insert a wooden dowel or a sturdy straw through the center of the layers to provide vertical support.
- ●Q: Can I use milk chocolate instead of semi-sweet?A: Yes, but milk chocolate has a lower melting point and contains more sugar. This results in a softer ganache that may not set as firmly, so you might need to increase the chocolate-to-cream ratio for better stability.
- ●Q: What is the best way to carve the cake without it crumbling?A: The most effective method is to freeze the cake layers for about 30 minutes before carving. Using a sharp, serrated knife and making slow, deliberate cuts prevents the cake from tearing and ensures clean, jagged edges.
- ●Q: Can I make the cake a day in advance?A: Absolutely. In fact, baking and stacking the cake a day early is recommended. This allows the structure to settle and makes the carving process easier. Just apply the ganache and decorations on the day of the event.
Why This Recipe Belongs in Your Weekly Rotation |
While a tiered haunted house is a special occasion project, the base chocolate cake is versatile enough for any day. It provides a reliable, moist crumb that works for birthdays, holidays, or simple weekend treats.
Mastering the ganache technique opens the door to many other desserts. Once you can create a stable, glossy glaze, you can elevate any simple cake into a professional-looking dessert.
Incorporating these baking skills into your routine encourages creativity and precision. Whether you are building a spooky manor or a simple layer cake, the fundamentals of structure and flavor balance remain the same.
Final Thoughts |
This Haunted House Cake combines a sturdy chocolate base with a luxurious ganache finish, resulting in a dessert that is as visually impressive as it is flavorful.
It offers a rewarding challenge for anyone looking to move beyond basic baking and experiment with cake architecture and thematic design.
Gather your ingredients and begin building your own chocolate manor for a memorable addition to your next celebration.
Haunted House Cake with Chocolate Ganache
- Total Time: 1 hour 20 minutes
- Yield: 12 servings 1x
Description
A towering, structural chocolate cake carved into a haunted house shape and coated in a glossy dark chocolate ganache.
Ingredients
- 2 cups all-purpose flour
- 3/4 cup cocoa powder
- 2 cups granulated sugar
- 1.5 tsp baking soda
- 1 tsp salt
- 2 large eggs
- 1 cup buttermilk
- 1/2 cup vegetable oil
- 1 tsp vanilla extract
- 1 cup boiling water
- 12 oz semi-sweet chocolate, chopped
- 1 cup heavy cream
Instructions
- Preheat oven to 350F and grease three 8-inch cake pans.
- Whisk flour, cocoa powder, sugar, baking soda, and salt in a large bowl.
- Add eggs, buttermilk, oil, and vanilla; beat on medium speed until combined.
- Stir in boiling water by hand; the batter will be thin.
- Divide batter among pans and bake for 30-35 minutes until a toothpick comes out clean.
- Cool cakes completely and level the tops with a serrated knife.
- Stack cakes with a thin layer of frosting between them and carve into a house shape.
- Heat heavy cream until simmering, pour over chopped chocolate, and let sit for 5 minutes.
- Whisk ganache until smooth and pour over the carved cake.
- Decorate with cookies or candies once the glaze has set slightly.
- Prep Time: 45 minutes
- Cook Time: 35 minutes
- Category: Dessert
- Method: Baking
- Cuisine: American